Easy Peasy Wrist Wallets

Way back when I was running regularly, I always struggled to find a way to carry my basics that wasn’t intrusive. I didn’t like arm bands and waist bags never felt right. Eventually I started making these little spandex wrist wallets and I liked them so much this is now the only wallet style I use. I am prone to always thinking I’ve lost my wallet and panicking; this has saved me a LOT of grief.

And they go together really quickly. I like to make a few at a time, so you’ll see some different fabrics here. You really only need some scraps for this one, which makes it a good way to use those fabric pieces you can’t bear to toss, but that have few uses.

Because this is made with spandex, the sizing is pretty forgiving. I would say I have an average size wrist for a woman, and I came up with this for myself. If you need to make adjustments for wrist circumference, I’ll tell you where to do that below.

Here’s what you’ll need:

  • Old T-shirt or stretchy fabric scraps

  • Spandex scraps

  • Small zipper (I like the 4” ones, but you can cut down a longer one)

  • Thread, scissors, etc. — the basics!

The FIRST thing I do is cut a reinforcing lining fabric for the pouch. I usually use an old T-shirt or some other fabric scrap that’s a little stretchy but not as stretchy as my spandex, to give the pocket a little more body.

Cut 2 pieces of lining 5 inches by 3.75 inches. Orient the fabric so it stretches most across the 3.75 inch width.

Next, cut 2 pieces of your spandex fabric in the same size.

1-wrist-wallets.jpg

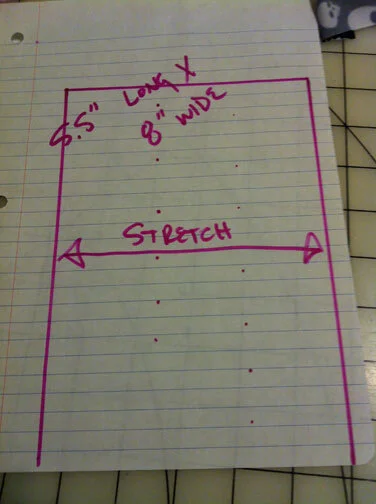
Next up, you’ll need to cut a piece of your spandex for the section that goes around your wrist. This piece should be about 5.5 inches by 8 inches, with the most stretch across the 5.5 inches. Behold, this confusing pattern piece I made myself forever ago! You only need to cut one of these.

Note: This is the piece to change if you need to adjust for bigger or smaller wrist circumference. It’s the 5.5 measurement you want to change. For a smaller wrist, you can try it at 5" inches; for a larger wrist, go up to 6 inches.

2-wrist-wallets.jpg

To start sewing, fold your biggest piece so that the two 5.5 inch edges are right sides together, and sew along that edge using a stretch stitch if your machine has one. If it doesn’t, a zigzag will do!

3-wrist-wallets.jpg
4-wrist-wallets.jpg

Turn the little tube you’ve made right side out. Align the seam so it sits in the middle of one side of the tube.

5-wrist-wallets.jpg

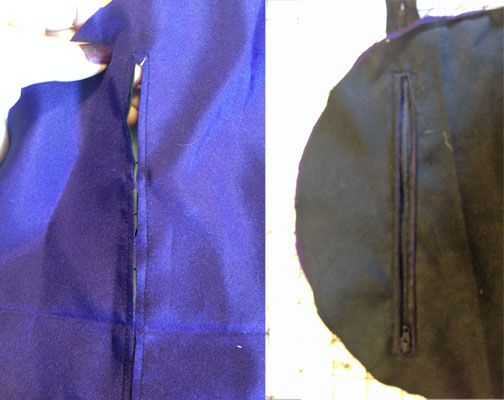
Next up: sewing the pouch fabric to the zipper!

Sandwich your fabric and zipper together so that you have your lining fabric at the back, the zipper on top of that right side facing up, and the exterior fabric right side down, aligning the cut edged along the zipper tape edge.

Stitch all three layers together about 1/4” in from the edge. A zipper foot will help you here, but if you have a sewing machine that lets you align your needle to the left, that also works fine and is usually how I do it.

Repeat this step on the other side of the zipper with you remaining pieces of fabric and lining for the pouch.

6-wrist-wallets.jpg

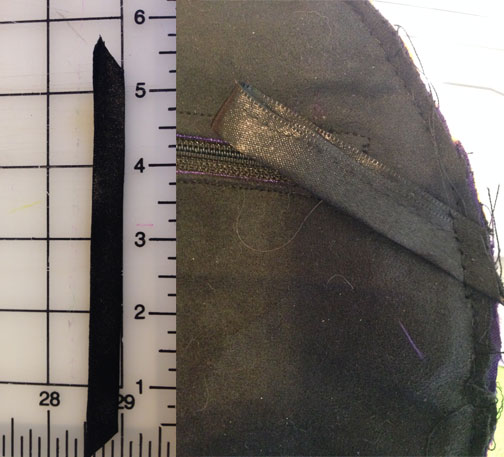
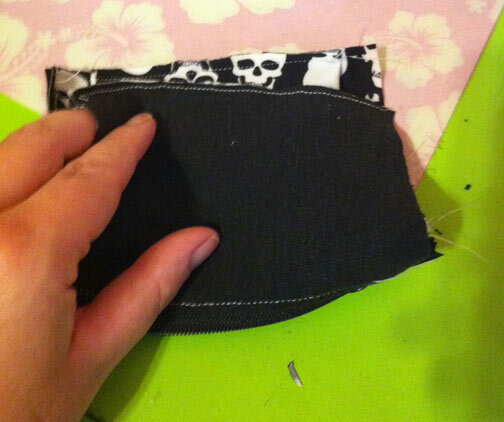
Turn out the fabrics you just stitched, so they sit like wings to each side of the zipper, and top stitch along each edge about 1/16 of an inch from the fold. Be careful to make sure your lining layer is fully folded outward. If you wish to press before this step, be careful with heat and spandex — keep your iron on a low setting and test a small piece first.

7-wrist-wallets.jpg

After you top stitch near the zipper, baste the lining to the exterior fabric around all raw edges of the pouch fabrics. going forward, you’ll just treat those two layers as though they’re on piece of fabric.

Take the tube you made from spandex and place it seam side down on the right side of your zipper/pouch assembly. Align it so the raw edges of one end of the tube sit about 3/8 - 1/2 inch from the top stitching next to the zipper.

8-wrist-wallets.jpg

Sew the tube to the pouch fabric, through all thicknesses, about 1/4 inch from the raw edge.

9-wrist-wallets.jpg

Flip the tube to the left and top stitch a little more than 1/4 inch from the edge of the fold. (You’re hiding the raw edge of the tube underneath.)

10-wrist-wallets.jpg

Flip the tube back to the right and baste the remaining raw edge of the tube to the right hand edge of the pouch assembly.

11-wrist-wallets.jpg

At this point, you have created the wrist band that your hand will slide into. You can test it for fit and adjust as needed.

12-wrist-wallets.jpg
13-wrist-wallets.jpg

Open up your zipper before continuing. Otherwise, you’ll stitch your wallet permanently inside out!

Once it’s open, fold the pouch section along the zipper as the fold, so all the raw edges meet up and your fabric is facing right sides together and your lining is on the outside. You’ll want to make sure your wrist tube is tucked into the inside-out pouch.

14-wrist-wallets.jpg
15-wrist-wallets.jpg

Sew along the 3 fabric edges of your pouch, catching it the raw edge of the tube along the long edge. If you like, you can also zigzag around these edges to make sure it’s secure. (I usually check to make sure I didn’t accidentally catch in any of the loose strap fabric first.)

16-wrist-wallets.jpg

Turn your wallet right side out through the open zipper, and voila! You’re ready to stash your necessities and go on an adventure!

I sometimes fine that the end of the zipper tape flaps around and is annoying; in those cases, I just tack those into the interior of the wallet with some hand stitching or even a quick straight stitch on the machine if I’m being lazy.

17-wrist-wallets.jpg
19-wrist-wallets.jpg

Star Wars-inspired Ponchos

The "Star Wars" saga is loaded with inspiring costumes, and a lot of that style translates pretty easily to street wear. While I've long been enamored with the jackets of the galaxy far, far away (who isn't?), lately, I've been thinking a lot about ponchos. 

Plenty of characters from "Star Wars" wear ponchos -- Qui-Gon, Luke, Leia, Jyn and Rey are just some of the key players to sport them. But as I started to think about making myself a couple of ponchos, I didn't want to make costume replicas; instead I just wanted to make some ponchos with a fun nod to my favorite film franchise. 

I should also point out that this whole idea started when Hot Patterns released their Fast & Fabulous Glamour Poncho.  I really like the placket detail on this pattern -- the fact that you can wear it buttoned up or open made me think of the style of so many shirts that show up in "Star Wars."

It immediately got my brain whirring and wondering about design ideas. And then I thought of Captain Phasma's cape, black with red trim. And then I HAD to make a First Order poncho. 

First-Order-Poncho-2.jpg

For this garment, I used a really yummy bamboo rayon French terry that I got from Fabric.com. I added a First Order patch that I had in my stash (I buy WAY too many patches), and used brushed silver buttons as a nod to my muse Phasma. 

First-Order-Poncho-1.jpg


But I remain, in my heart, a Rebel through and through, so I needed another poncho option to represent the freedom fighters that I've loved since I was 6. So I decided to make a second one from the same pattern and just switch up my fabric, button and patch choices. For this second one, I went with a moss-colored rib knit that I bought a while back for no reason whatsoever, and a charcoal bamboo rayon French terry for the accent band. The buttons were purchased at my local fabric store, and I found the patch on Amazon. 

Rebel-Poncho-1.jpg


For both of my ponchos, I opted out of using interfacing in the collar. My collars are floppy as a consequence, which was intentional -- I abhor having stiff fabrics around my neck. But if you prefer a more crisp finish to your project, interfacing is the way to go. 

Rebel-Poncho-2.jpg

The pattern is one-size-fits-all, but you have length options. I'm 5'3" and went with the middle length, but it is definitely long on me! I wanted some extra length, but if I make another one of these in the future I might opt for the petite version. 

The weight of the fabric definitely adds up, so if you want to keep things light, you'll want to select different fabrics. But my ponchos are both SO warm and cozy that the weight is worth it. I can layer one over a light jacket or cardigan and still feel nice and toasty outside in chilly weather.   

I can't wait to wear one of these to my next screening of "The Last Jedi"! Which reminds me ... I have a Holdo poncho idea for a future blog. 

Transform a Tank Top!

Summer is drawing to a close (though it's still delightfully hot here in Atlanta), and you may be wondering how to squeeze a few more weeks out of your most-loved tank tops. Or, maybe you just want to change things up, or maybe you just don't love to show your upper arms. Honey, I've got you. 

Here's a simple way to add a sleeve to a racerback tank. The cut of a racerback means you can't just fit a regular sleeve onto it, but I have a sneaky way to draft a sleeve pattern. You just need an old T-shirt you don't mind cutting apart. You'll also need about a half yard of a soft knit (prewashed) to make your sleeves.

First, put your old T-shirt on your dress form, with the tank top over it. (If you don't have a dress form, bribe a friend to either be your model or draw on the shirts while they're on you!)

Next, trace along the edge of your racerback arm opening, all the way around the back and front. 

Add a seam allowance by drawing another line about 1/2 inch outside the first line. Then cut your shirt along that line. Note: You really only have to do this on one side; you'll just cut your second sleeve as a mirror to this one. 

Once you've cut your sleeve off your T-shirt, cut it open along the underarm seam. 

You now have your basic pattern!

I wanted to add a little peekaboo detail to my sleeve, so I cut a hole in my pattern piece. When I cut my sleeves, I also flared them out a bit past where the T-shirt pattern ended, to create a little bit of a bell sleeve. 

To make a facing for my peekaboo window, I just laid a scrap of the same knit I used for my sleeves right sides together with the sleeve piece and stitched around the circle. Then I clipped it around the interior of the circle, turned it, and gave it a press.

I top stitched around the edges of my circle, then I trimmed my facing fabric close to my top stitching. (This is why you can just use a scrap and don't need to specifically cut the facing before you sew it in place. Just as long as it's big enough to span the width of your peekaboo hole, you're good!)

Once my peekaboo was done, I stitched the side seams of my sleeve closed. And then I basted it in place to the interior of the shirt. From the outside, I machine stitched the sleeve to the shirt.

And that's THAT! I added sleeves to a Tatooine shirt that I bought a couple of sizes too big for a swingy, casual top I could wear over leggings or fitted trousers.

Here's a little more detail of how the sleeves look on the finished project:

And finally, the REAL reason I wanted to add the little sleeve windows: so I can show off my Greedo tattoo. All Star Wars, all the time. :)


The New Favorite Dress

You guys, I have a new favorite dress.

You know how you have a fabric you love but you love it so much that you can't decide what to make with it?

And how you also covet an expensive pattern, and you keep the info for it on a list to wait for the day when you happen to be at the fabric store when that pattern line is on sale?

And how SOMETIMES your creative brain puts those two things together at the right time?

That's me, with this dress.

The fabric is a cool First Order print that came out a couple of months before "The Force Awakens" hit theaters.

I loved it so much when I bought it that I literally drove home with it in my lap so I could look at it when I was stopped at lights.

The pattern was Vogue 9145. I LOVED this the second I saw it. It's modern and different and SWIRLY and it has a full skirt.

Once I had the pattern in-hand, I thought about all kinds of fabrics I wanted to use for it. As you may have noticed if you've read any of my other dressmaking posts, I am a fan of knits. This dress has a LOT of pieces all stitched together, and if I were making it with wovens, the pieces would be cut on the bias. But, ever on the quest to experiment and find my own way, I started thinking about how fun it might be to make this dress with a combo of a knit and a woven.

That's when it struck me. I had that yummy directional Star Wars print, and loads of black French terry (I buy it in large quantities when I find a good deal). I decided to cut the print on the bias as called for in the pattern, and then cut the knit on the straight of grain.

I wasn't sure if I would be able to eke out all the pieces I needed from my First Order print. The pattern called for 3 yards, and I only had 2 1/2. Since I am shrimpy, I cut several inches off the bottom of each pieces at the hem, and that enabled me to get all my pieces cut from what I had on hand. While the cutting took a while, the dress actually went together rather quickly, once I had my pieces in order. (I recommend either keeping each cut piece of fabric with its corresponding pattern piece, or using stickers to label each cut piece.)

I eliminated the facing pieces, and instead used a thin strip of knit as a mini-facing to finish the neck, arm openings and hem.

The actual sewing only took about 2 hours total. No zipper, as there's plenty of stretch to pull it on.

And now, I almost feel like I should apologize to everyone for how often I'm going to wear this thing. Bear with me; I'm in a Star Wars swirl trance.

My New BB-8 Birthday Dress!

So, I turn 45 today. What better way to celebrate another loop around the sun than with a new dress? Because I share my birthday with Star Wars -- "A New Hope" debuted on May 25, 1977 -- it always seems only natural to make some Star Wars finery for the occasion.

I designed a new BB-8 damask a while back, and when Spoonflower had a 20 percent off sale recently, I jumped on it and got a couple yards of modern jersey. I have been really pleased with the detail Spoonflower manages on their jersey, and this one came out beautifully.

I decided on Simplicity 1587 for the bodice, but I chose to make it using black French terry for the front yoke, sleeves and back, and then my damask for the lower bodice and skirt. (Gotta conserve that custom printed fabric!) Since I used all knits, I skipped the zipper, as is my usual habit. Pull-on vintage style FTW! 

The skirt is a simple circle skirt -- all the better to wear with a fluffy petticoat! 

It only took a few hours to pull this one together -- one of the many reasons I love to work with knits. I look forward to wearing this dress all day, staying comfy through all the celebrating, but still vintage stylish!

A Modern Flapper Bride

My dear friend and podcast co-host Tracy got married recently, and I was honored to be entrusted with creating the bride's dress. Early on in the discussion, the 1920s was settled on as the style inspiration, and Tracy wanted her favorite color, blue.

It started with a sketch. I am NO sketch artist, as is abundantly obvious here. But fortunately, Tracy has vision that fills in the gaps where my drawing skills fail, and she approved.

We sourced a handful of blue satin fabrics for the under layer, eventually settling on a periwinkle charmeuse. I knew I wanted to use English net for the beaded outer layer, so we just had to get a swatch from a supplier to confirm that it was good stuff. The dress construction itself was really simple -- it's just a basic sleeveless shift. The charmeuse layer was cut on the bias so it would skim close to the body; the English net was cut on the straight of grain, because the weight of the beads on it would pull it down in a way that would hug Tracy's figure.

Once I had the dress sewn together, the beading marathon began. I started by running a series of bugle and seed bead lines around the armscyes and the neck edge.

Then I slowly built out the design from there. All of the beading designs I used were based on techniques I saw on garments from the 1920s.


I knew I wanted to create a basket weave effect with beaded lines to create the diamond pattern on the dress. This turned out to be a mathematical challenge! I knew the beading had to follow the lines up from the points on the hem to converge in the design points that defined the yoke area. I ran numerous basting lines, only to take them out in frustration when I realized that I had calculated the trajectories incorrectly. Eventually, I came up with a really unorthodox, but ultimately effective solution: I laid out the lines on the dress using painters tape, and THEN, when I had them right, I ran the basting along those lines. Phew. Problem solved. In the end, things lined up nicely. Here's a shot of the back of the dress with the lines of beading converging.

One of the design elements I wanted to include in the dress was a series of Minecraft diamonds rendered in beads. Tracy and her wonderful groom Patrick play Minecraft together a lot, so I wanted to give a fun, nerdy nod to that in the dress.

My test diamond turned out pretty well:

And it seemed like it would be great when I pinned it to the dress to see how it would sit. Full steam ahead.

(You can also see in this photo the inset I added to the top of the charmeuse layer -- the neckline sat too low on Tracy when we did one of her early fittings, so I added that in, knowing beading would cover the seam once the dress was embellished.)

But when I stitched the diamonds directly onto the English net, they just didn't work. The weight of the beading on the net was pulling it in a way that distorted the shape of the diamonds and made them look like odd, random bead clumps. So, off they came, and I did a little redesign.

Another change that we made along the way was the inclusion of clear, iridescent sequins. Initially, I thought that I wouldn't use sequins, but all the beading was making the dress heavier and heavier. The sequins offered a way to add embellishment with far less weight. They also brought a whole new feel to the dress with their light-catching sparkle.

The timing on this project was right down to the wire. Life kept throwing me obstacles that would rob me of beading time, which was SUPER frustrating. I finished the last bit of beading on my lunch break the DAY BEFORE THE WEDDING, just a few hours before we left to drive up to North Caroline for the event. I never like to cut sewing projects that close, particularly when I'm stitching for other people. Nerve-wracking!

But then the big day came, and Tracy's hair and makeup was phenomenal, and we slipped the dress on her, and her transformation into Phryne Fisher was complete!

You'll be happy to know the Minecraft diamonds still found a place on the dress -- I put them at the very bottom where the distortion effect was offset by the structure of the faced hem. You can also see below that I added some flouncy gores to the charmeuse layer, and then another chiffon layer under that. Plus, lots of beaded fringe!

Tracy was just lovely in her full getup -- the perfect modern flapper!

And, perhaps my proudest achievement: No beads flew off the dress when the darling newlyweds danced! (And those under layers had great movement when Tracy twirled. Huzzah!)

Congratulations to the beautiful couple on the next phase of their life together. I'm so glad I remembered to pack my hanky in my bag for the wedding, because I CRIED and CRIED. It was lovely, and I feel lucky to have gotten to contribute to their special day.

For additional photos of the fabulous Tracy and Patrick nuptials, click here.

And now, get ready, because with that project wrapped, my brain went BANANAS coming up with new things to sew!

It's a Greedo Springtime!

Winter is FINALLY taking a hike. That means swingy spring dresses are now de rigeur! Since springtime makes me think of the color green, I got to thinking about one of my favorite green things -- Greedo from "Star Wars: A New Hope." He's my fave SW character (I can't explain it; I just love him and want him to be my bestie), and I can never get enough Greedo goodies.

So, I played around in Photoshop to make a Greedo Damask pattern, and ordered a couple of yards of it printed on Spoonflower's Modern Jersey.

While I awaited my fabric, I selected a pattern. I settled on Simplicity 8015 for the bodice. I liked the colorblocking of view D, and the sleeve length of view C. Using patterns that aren't necessarily designed for knits, especially when it comes to dresses, is one of my favorite pattern hacks.

Because I had a lovely French terry for my black fabric that has an extremely smooth hand and a lot of stretch, I skipped the zipper entirely, so my dress just pulls on, easy peasy. I didn't want a gathered skirt, though, so I just cut a simple circle skirt instead. That way it has all that nice, swingy volume, but doesn't add bulk at the waist.

I also added a band around the neckline, made with a strip of the same black French terry. I don't like fussing with facings, especially when working with knits, and it ends up with a very sporty neckline this way.

So now I am ready to welcome warmer temps! I have some other custom Greedo fabric (FLORAL!!) so watch this space for more knitwear from a galaxy far, far away!


Lace Finery Fit for a Queen (or Princess)!

Lace crowns are experiencing a serious uptick in popularity right now -- and why not? They're darling! They also combine the best elements of princess style, DIY and shabby chic. Bonus appeal: you can probably find some bits of lace trim long enough to start this project already lurking in your stash.

This project is pretty easy, though there is some mess involved. First off, you have to soak your lace trim in fabric stiffener for a little while. This photo shows me dragging my lace through the stiffener to make sure it got fully coated before I mushed the whole piece into the liquid.


Once your lace is well-coated with fabric stiffener, you just need to squeezed out any excess and lay it flat. Remember to protect your work area with a non-porous covering -- I just used a trash bag.


Here is a piece of dry lace next to the wet, stiffener soaked piece, just so you get a sense of what to expect:


Unlike the photo above, you'll probably want to have multiple pieces drying at once so you can optimize your time.

Once your lace is fully dry, you can start playing! (Note: If your lace is dry but not as stiff as you'd like, you can apply another coat of fabric stiffener, I just brush it on in this case, being careful not to let the liquid collect in the gaps of the lace.)

If you're making full-circle crowns, you'll need to close them up. Some people use glue here, but I like to stitch mine. Either way works just fine. You want to overlap your ends a little, and if possible, line up the repeat design of your lace to hide the join.


Once your crown is sewn or glued into its circle shape, you can paint it any color you like! You can use spray paint or craft paint with a brush (again, be careful to keep the paint from filling in the holes in your lace and obscuring the design). Here's a mini-crown, painted purple:


The best thing about this project is how creative you can be with embellishments. For this full-size crown, I kept it simple, and just painted it silver and added a sparkly pin from my jewelry drawer:


You can also coat your crown with a thin layer of Mod Podge and apply glitter:


Only have a small amount of a lace trim, but you love it and want to make something out of it? No problem! Just make a tiara instead of a crown:


For the tiara, I tacked each end of my lace to a headband with a series of small stitches, and then put a daub of glue over the stitching for extra security. This can be worn tiara-style as shown above, or as a fancy headband by situating it so the lace sits flat against your head. I embellished this one with a few hot fix crystals.


And then, my favorite variation on the lace crown project -- tiny crown fascinators:


Like the tiara, these are just attached to a headband with small stitches and glue. These two are painted with pink and purple paint with a bit of glitter mixed in, and then embellished with rhinestones. (I am clearly madly in love with my hot fix applicator.)


There are so many more ways to play with this project! You could add buttons, ribbon, fabric flowers -- anything that will glue or sew on is fair game! You could make these up as amazing favors for a princess party -- or just make the basic crowns and let the princesses decorate them. It's a really inexpensive project, so you can experiment and play with a bunch of designs without worrying to much about cost or waste. That's a good thing, because I already have a bunch of ideas for my next batch ...


Cameo Silhouette Bag

Silhouettes and cameos have been enduring icons of art for as long as I can remember. And with good reason; the simplicity of such items gives them a versatility that's incredibly appealing. Any visage can be silhouetted.

I wanted to make a bag that borrows from the style of cameos and silhouettes, and give a nod to a classic Disney villain: Maleficent. After all, is there any silhouette more memorable?

This is a relatively simple project, and while I made a bag, you could just as easily use the same method to create a pillow, a patch, a detail on a skirt -- you name it.

To begin, I searched for black and white, simple art online, and then did a bit of tracing.

I actually traced the image twice -- first onto plain paper, and then a second time onto tissue paper. The tissue paper (which is recycled from a gift bag I received at some point in time) is too thin to safely trace onto with a marker for fear that the ink would bleed through to my tablet screen. Once I traced the image the second time onto the tissue, I cut an oval around the design. This became my pattern for the whole project.


I cut one layer of my entire oval out of sateen, two layers out of faux suede, two layers of satin for lining and a layer out of fleece. To create the front piece of the bag, I made a stack of pieces that started with the fleece layer, then the sateen layer, then a faux suede layer, and placed my pattern on top. 


Then I stitched over the lines of my drawing. I flipped the whole thing over so you can see what the stitching looks like on the back fleece layer.

Once the stitching was complete and I clipped all my loose threads, I tore the tissue paper away. For the little nooks and crannies, I used tweezers to help pull stray paper from the stitches.


Then I carefully clipped the top layer of fabric away, about 1/16 to 1/8 of an inch from the outermost stitching line. I used faux suede to avoid fraying, but something like vinyl or leather would also work -- anything that won't come apart at raw edges. 


To prep the back and install the zipper, I drew a line across the bag lining where I wanted the zipper to sit, then stitched a narrow box around it through the lining and my second piece of faux suede, right sides together. Because my suedey fabric is fairly stiff, I didn't bother with interfacing it, but if you use a fabric with a drapey body, you might want to add some interfacing or an interlining. I clipped the narrow box and turned my lining to the inside, pressed the folded edges, and then stitched my zipper into the opening from the outside. (Apologies for the fuzzy photos here -- they looked OK on the preview screen, but not so much at full size!)


Once my zipper was in place on the back of my bag, I basted the front and back together (adding in the lining layer for the front as well). So at this point along the edges, I have sateen, fleece, lining, lining, faux suede.


To make loops to clip a strap to, I folded a 12-inch piece of 1-inch wide ribbon in half lengthwise and stitched it closed like a tiny tube. Then I ironed it flat. I cut two pieces from it, each a little shorted than 6 inches, and I basted those at an angle to the back side of the bag.


Then I used bias tape to stitch eveything together and enclose all the raw edges. I wasn't especially careful here, as the tape edges would all soon be covered. 


The last step was to stitch a length of decorative lace all around the exterior edge, covering the bias tape and mimicking a pendant setting for a cameo or a frame for a silhouette. Then I clipped a strap I had to the ribbon loops at the back and voila! Ready to hit the town (and go to a Disney park)!


Star Wars Half Marathon 2016 Running Outfits

One of the fun things about running in big events is crafting unique outfits to wear on the course. This year, there was a little bit of a wrench thrown into the mix for many runners when runDisney announced new costumes rules just two days before marathon weekend in Orlando. That race weekend preceded the Star Wars event by a week. So, runners who like to costume got to see a sampling of what did and didn't make it through security for the Orlando weekend before we headed to Anaheim for Star Wars fun.

I usually try to pare down my outfits to make sure I'll be comfortable anyway, so I wasn't too concerned. My only real fear was that my gloves for my Ackbar 5k outfit might have to go, and I was prepared to ditch them if I needed to.

My ensemble was reviewed at security, but ultimately got the OK. This outfit was fun, and pretty easy -- I had the hat and gloves from last year, so I just used black pants and faux boots I had on hand, and bought a cream turtleneck at the thrift store. The only new piece I made was the vest, which was simple and made from gold sweatshirt fleece that I overdyed with apple green to get that unique greenish mustard tone. The admiral's insignia is an applique with satin stitched details.

My 10k outfit was put together at the VERY LAST MINUTE. I literally wrapped it up just a couple of hours before we left for the airport. (And even so, I needed to pack paint with me to finish the hat.)

I was pretty happy with how the dress turned out, especially considering its last-minute nature. It's just a basic spandex dress that I whipped together and detailed with appliques to mimic Chopper's body design. I decided to add a little back interest with some iron-on letters in Chop's actual droid letter/number name:

The hat is just poster board taped together and then covered with fleece and a final orange knit layer. Then I glued the details on. The antenna is made from a medicine syringe I had on hand from one of the cats' vet adventures. I just painted it pale silver and poked it up through the center from the inside and hot glued it in place.

Both the hat and the dress got some weathering with paint and a sponge brush.

I had a blast running in this costume, though I was surprised at how many people didn't seem to know who Chopper is! I got called C-3PO three times. Oh, well! I had fun just the same!

My outfit for the half marathon was pretty basic. I had already made my Salacious Crumb cap a while back as part of a blog project for StarWars.com. The dress started out as a pile of white Lycra which I dyed -- using just RIT dye in Tan -- to a nice golden tone. Then I whipped it into a dress, and pinned a strip of fur along the neckline. (I didn't sew it on because I knew I'd need to be able to just toss the stinky running dress in the wash.)

This was a REALLY fun outfit to wear for a race. It was comfy, and it made people laugh. A word to the wise, though: If you're not interested in talking to lots of strangers, don't wear a kooky outfit. I love meeting new people and am especially friendly when I run, so for me it's fun!

Now, it's time to turn my thoughts to princess running outfits for next month's Glass Slipper Challenge, and the Dark Side Challenge after that. Some of that may be recycled ensembles.  But for now, it's just time to launder these and rest!